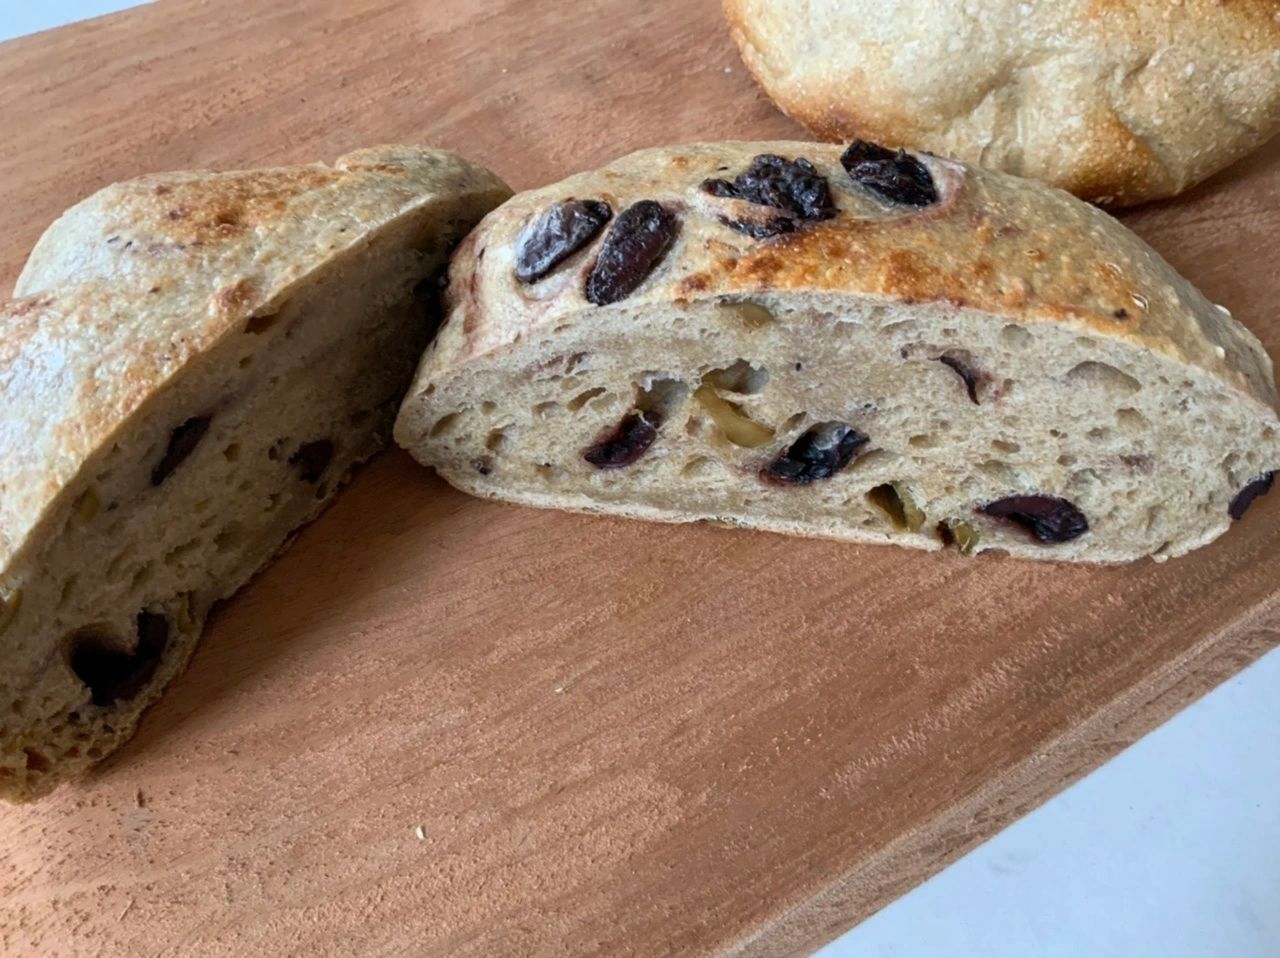
Sourdough Olive Bread
We follow the recipe from the Perfect Loaf for the ingredients and we stick exactly to the measurements provided because they really work. Where we diverge is the timing and then, of course, whatever add-ins you’d like in your bread. We love Greek olives, so we add both green Greek olives and Kalamata olives. But we have also added in sesame seeds and other nuts and seeds, too. You could absolutely add dried fruit, and perhaps make an apricot-pecan loaf for good breakfast eating!I’ve divided the recipe into 8 parts, the final one is eating it, so that’s not too bad!
Equipment
- +Food scale with measurement in grams (most come both in ounces and grams)
- +A large bowl for proofing the dough
- +Two 2.5-3-quart round cast-iron Dutch ovens with lid (can use one and bake the loaves separately if you only have one)
- Parchment paper
- +Sprayer bottle for spraying the oven and the loaf with water during the baking process
- +A bread lame (utensil for scoring the dough before baking – can also use a sharp knife)
- +Active/ripe Sourdough Starter (or make your own)
Ingredients
Levain:
- 40 g bread flour
- 40 g whole wheat flour
- 81 g water
- 8 g ripe sourdough starter
Bread Dough:
- 169 g levain (from the ingredients above)
- 161 g 161 g whole wheat flour
- 766 g 766 g bread flour
- 19 g salt (we use pink Himalayan salt)
- 685 g water (split 635g and 50g)
- 1 cup kalamata olives, pitted and halved
- 1 cup green Greek olives (such as Chalkadiki or Mt. Athos), pitted and halved
Instructions
Part One – Sourdough Starter
- Obtain a sourdough starter either from a friend, a local bakery, a starter kit or make your own. https://www.feastingathome.com/sourdough-starter/You will use a portion of this starter for your bread, and you will use a portion to keep as the starter that you feed every ten to keep it going. We keep the starter on the kitchen counter for several hours or even up to a day after feeding it, and then refrigerate it until we are ready to use it or feed it again. This way we only have to feed it once every ten days or so. When you feed the starter, mix 50 g of the starter with 50 grams of bread flour and 30 g of water. Discard any remaining starter or double the recipe and give some to a friend. You can also make pancakes or other items with the discarded sourdough starter.
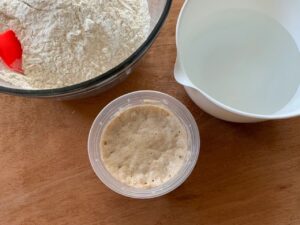
Part Two - Making the Levain
- Levain is a portion of the sourdough starter that you use as the base for your bread dough, mixed with bread flour, whole wheat flour and water. . 8 g ripe sourdough starter40 g bread flour40 g whole wheat flour81 g waterMake this the night before (or 10 hours before) you plan to make your bread, and everything will fall into place much better. The first time I made this in the morning and ended up at 3 a.m. baking my bread! Mix all levain ingredients in a small glass or plastic container. Cover and leave in a warm place on the kitchen counter for about 10 hours.
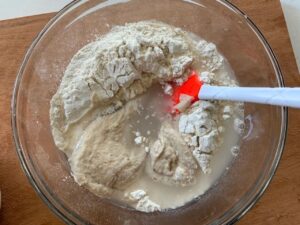
Part Three – Autolyse
- This is where you mix the flour, water, and levain allowing the flour to hydrate for 20 minutes, which is especially important when using whole wheat flour.
- In a large mixing bowl, combine the levain, all of the bread flour and whole wheat flour and 635 g of water. Mix well until there are no bits of dry flour remaining. Cover the bowl with plastic wrap or a damp kitchen towel, and allow to sit for 20 minutes. *Note-You will add the remaining 50 g of water during the dough mixing step.
Part Four - Making the Dough
- Add the salt, extra water, and any extra ingredients, i.e. olives, sunflower seeds, nuts, etc. to make the dough. Mix thoroughly and strengthen the dough by kneading it right in the bowl for about 5 minutes right in the bowl.
Part Five – Bulk Fermentation
- Transfer the dough to a clean container, cover it, and allow it to ferment for about 3 ½ hours. During this time, you will need to stretch the dough twice, once after the first 30 minutes and the second at the one-hour mark. After the second stretch, just leave the dough, covered and untouched for the remaining 2 ½ hours.
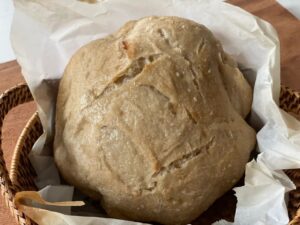
Part Six – Shape the Loaves and Allow to Proof (rise)
- Remove the dough from the fermentation container and place it on a lightly floured cutting board or clean work surface, such as your counter. Divide the dough in half and form each half into a boule (round shape) or batard (oval shape). Let rest, uncovered, for 30 minutes.

- Now, refine the shape of each loaf and place each one into a separate bowl and cover with plastic wrap or a damp cloth for the proofing process. Allow to proof anywhere from 3-6 hours, or until the dough looks to be the right size for a typical sourdough loaf. We usually let ours rise for about 4 hours before baking. This can be done either in or out of the refrigerator. If you proof your loaves in the refrigerator, they will be easier to score (or make decorations on the top), but it works either way, in or out of the refrigerator.
Part Seven – Bake
- Preheat oven to 450 F. When preheated, spray inside the oven with a few squirts of the water to create a little humidity.
- Line your cast iron Dutch ovens with parchment paper and move your proofed loaves onto the parchment paper. Score your loaf with a knife or a scoring utensil ( a bread lame) to allow some of the air to escape during the baking process. Cover the Dutch oven with the lid.
- Bake, covered, for 27 minutes. Not more and not less! Remove the lid and lightly spray the top of the loaves with the sprayer bottle. Continue to bake for 5-7 more minutes, uncovered, until the bread has the color you prefer. Five minutes is usually perfect for us.
- Immediately remove from oven and when you can handle the loaves, move them to a wire rack and allow to cool completely (about 2 hours) before slicing or freezing or refrigerating.
Part Eight – Eat and enjoy the fruits of your labor!
- If you cannot use both loaves right away, simply wrap one of the completely cooled loaves in plastic wrap and store it in the freezer in a plastic baggie until ready to use.
- For the loaf you are using right away, store any unused portion in a baggie or sealed container in the refrigerator until ready to serve.