Brown Butter Cake
Take your cake game to a whole new level by using brown butter instead of plain butter. It takes a wee bit more time, but it is sooooo worth it! The nutty aroma of browned butter is alluring and the flavor is so much richer and more decadent than regular butter. Brown butter turns an ordinary yellow cake into an extraordinary dessert! Add whipped cream-toffee filling and top with dark chocolate frosting, and you’ve got a fancy cake to serve family and friends over the holidays! It takes an extra step or two to make this cake because you first brown the butter, then chill it again until solid in the refrigerator. At that point, you follow the usual process of softening the browned butter to room temperature, just as you would any normal stick of butter when baking a cake or cookies.This cake is rich and toasty and perfect for the holidays. I can't really say it enough!
Ingredients
Brown Butter Cake
- 6 ounces brown butter chilled to solid form and then softened to room temp (3 sticks unsalted butter will reduce to anywhere between 6-8 ounces once browned)
- 2/3 cup granulated sugar
- 2/3 cup light brown sugar
- 3 large eggs at room temperature
- 2 1/8 cups all-purpose flour
- 1/2 teaspoon salt
- 2 1/2 teaspoons baking powder
- 1/2 cup milk
- 1 teaspoon vanilla
Toffee-Whipped Cream Filling
- 1 1/2 cups whipping cream
- 2 tablespoons powdered sugar
- 2 teaspoons vanilla
- 6-8 oz. English toffee broken into small bits (can use Heath Bars, or your favorite toffee. We used Wildwood Chocolate's Texas Pecan Brittle Bar from Antonelli's Cheese Shop last time we made this cake, which was superb!
Cocoa Frosting
- 1 stick unsalted butter softened to room temp
- 4 oz. dark chocolate melted and cooled
- 4 cups powdered sugar
- 1/4 teaspoon salt
- 4 tablespoons milk
- 2 teaspoons vanilla extract
Instructions
DIRECTIONS
- Heat oven to 350⁰ F. Grease or spray an 8-inch square* baking pan. If you like nice even flat tops to your cakes, consider wrapping the sides of the pan with cake strips, which allows the cake to bake super evenly.
- In a large bowl, beat the softened browned butter with electric beaters or mixer, until soft and creamy. Add white and brown sugar and continue to beat until well incorporated and the mixture looks fluffy. Add eggs, one at a time, and continue to beat after each, scraping down the bowl as needed.
- Combine flour, baking powder, and salt and add to batter alternately with milk, beginning and ending with flour mixture. Stir in vanilla.
- Pour batter into prepared pan and bake for approximately 25 minutes before you check on it. If it is looking brown on top, cover the top loosely with foil to keep from getting too browned and continue to cook for another 5-10 minutes or so, until a cake tester comes out clean. Remove from oven and cool completely. Refrigerate for at least 30 minutes.
- *You can also use 2 eight-inch round pans, but bake for a shorter time. This way you won’t have to cut the cake horizontally, just spread filling in between layers before frosting. We love the square look of this cake though!)
Toffee-Whipped Cream Filling
- Whip cream until stiff peaks form. Fold in powdered sugar, vanilla, and toffee bits. Refrigerate until ready to use. Can be made a couple of hours before assembling the cake.
Cocoa Frosting
- Beat butter until soft and creamy. Slowly beat in the cooled, melted dark chocolate. Then beat in powdered sugar alternately with milk until desired creaminess. Stir in vanilla.
Cake Assembly
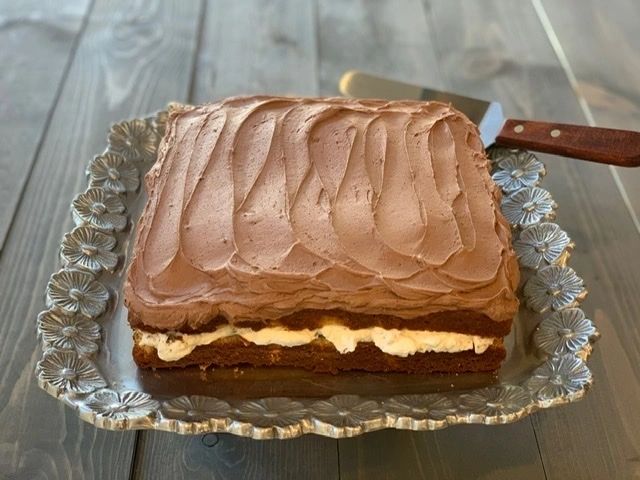
- When cooled, remove the cake from the pan and cut it in half horizontally using a large bread knife or even better with a long cake slicer. Place the bottom half on your cake plate. Spread toffee-whipped cream filling over the entire cut side of the bottom half of the cake. Place the top half back on top of the whipped cream filling.
- Spread dark chocolate frosting over the top of the cake. Sprinkle with a dusting of cocoa powder or powdered sugar, using a sifter or tea strainer. Refrigerate until ready to serve.
- Keep refrigerated and take out of the refrigerator about 10 minutes before serving.
Notes
*NOTE * If you want to make this cake ahead of time, use a stabilizer in your whipped cream.